CONTENTS
- Parent/Student Roles Overview
- Role Management
- School Assignment
- Types of Parent Roles
- Role Permissions
- How to Assign a Role to a List of Students
Parent/Student Roles Overview
The Parent Module uses roles in order to grant access to information in the parent module.
The role's permissions are then assigned to a student which will dictate whether the Parent User has to access to that screen for their student in the Parent Module.
To modify a role, you do so via Parent Access>Setup>Roles>Modify Role.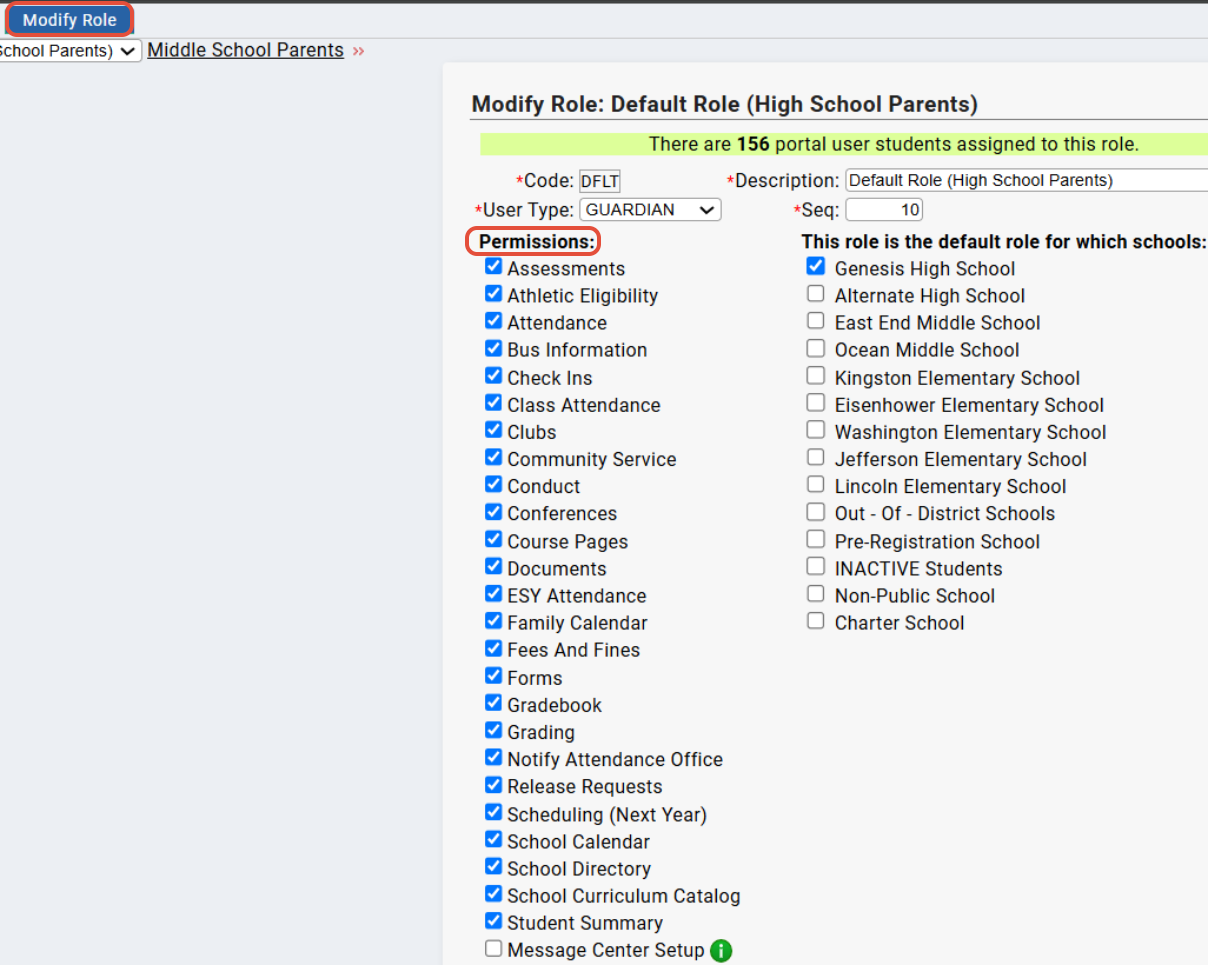
Roles in the Parent Module control which screens parent and student users have access to - can see and use.
Parent / Student Roles are listed and can be managed on the Parent Access>Setup>Roles screen
NOTE: Parent Portal Roles do not change during the rollover process. So, if a student moves from Middle School to High School during the rollover, the role would have to be modified manually by the district
Role Management
The role consists of a set of permissions that simply give access to a screen or not. A role is automatically applied to all students that a Parent User is given access to. The access role they receive depends on the list of roles added, whether they are marked 'Guardian' or 'Student' and the default school(s) set on the role.
Roles are linked to the students on an account, not to the account itself. Roles specify which screens and functions the user has access to with respect to the single student.
On a single account, different students may have different Roles attached. This makes it possible for a parent to see different features available when viewing their Middle School child versus their High School child, for example.
School Assignment
Roles can be linked to a school by checking off the school on the Parents>Setup>Roles>Modify Role screen and hitting save. Roles are linked to specific schools so that students will inherit those permissions based on their enrolled school, when they are added to a Parent User.
For instance, if a school did not want the discipline data of the elementary students to show up in the parent module, then a role for elementary schools could be setup which does not have the permission to view Discipline.
Once this is done, all students who are added to a parent/student account in the future will get the correct permissions for the parent/student portal.
NOTE: A default role for the "Pre-registration" school can be used to create specific access for parents of pre-registered students. If NO role exists for the "Pre-registration" school, roles will be defaulted to students based on their 'Next School' field instead.
Types of Parent Roles
Roles are each targeted to a specific type of user. There are five types:
- GUARDIAN - Users who are associated with a student as a Guardian.
- STUDENT - Users who are themselves a student (i.e. linked to a single student).
- COUNSELOR - Users who are linked to the student as a Guidance Counselor.
- VP - Users who are linked to the student as their Vice Principal.
- PRINCIPAL - Users who are linked to the student as the principal of the school they attend.
Role Permissions
- Student Summary - The home overview screen for a student. Shows basic info for a student including their current year schedule.
- Assessments – View the student's Assessments screen
- Athletic Eligibility
- Attendance – View student's Daily Attendance Calendar for the year
- Bus Information
- Check Ins
- Class Attendance – View students' Class Attendance in individual course sections.
- Clubs - Allows Parents/Students to see the clubs they are participating in as well as upcoming and past events for the club
- Community Service -
- Conduct/Discipline – View a list of a Student's Discipline transactions for the year, if any exist.
- Conferences - View and have the ability to schedule conferences for a student
- Course Pages - View the available teacher Course Pages for a student
- Documents – View the student's Document's screen
- ESY Attendance
- Family Calendar
- Fees and Fine - View a list of a student's owed fees and fines
- Forms – View the student's Forms screen and respond to questions.
- Gradebook – Gain access to the teacher's Gradebook entries for students, if the student's teachers are using the Genesis Gradebook.
- Grading – View the student's report card
- Notify Attendance Office - View and have the ability to post absent/tardy notices to the school's Attendance Office
- Release Requests -
- Scheduling – (NEXT YEAR) This tab is to view information about the student's Next Year course requests and tentative course schedule. If you are looking for settings to display the "current year" instead, that is controlled by the "Student Summary" option.
- School Calendar
- School Curriculum Catalog - New curriculum catalog screen that will show all catalog files and catalog descriptions for active courses in the student's school.
- School Directory
- Message Center Setup - Access their own "parent preferences" screen (e.g. change password)
The "Parent Portal Overview" article shows a snapshot of what each tab looks like in the portal!How to Assign a Role to a List of Students
A Role can be assigned to a list of students via Parent Access>Setup>Roles>Assign Roles.
Any parent accessing one of these students will see only those tabs allowed by the Role assigned to each student.
Procedure to Assign a Role to a Group of Students
- First, create a Student List with the students to whom you wish to assign a particular Role.
- Go to the *Parent Access>Setup>Roles>Assign Roles* screen
- Select the "role to assign"
- Select the student list containing the students to whom you wish to assign this Role.
- Click Assign . This assigns the selected Role to the students on the list.
Was this article helpful?
That’s Great!
Thank you for your feedback
Sorry! We couldn't be helpful
Thank you for your feedback
Feedback sent
We appreciate your effort and will try to fix the article