TABLE OF CONTENTS
To locate/update a logon ID, go to Setup>Security>Users, search for a logon ID, and click into it.
That will bring you to the Modify User screen for that specific logon ID.
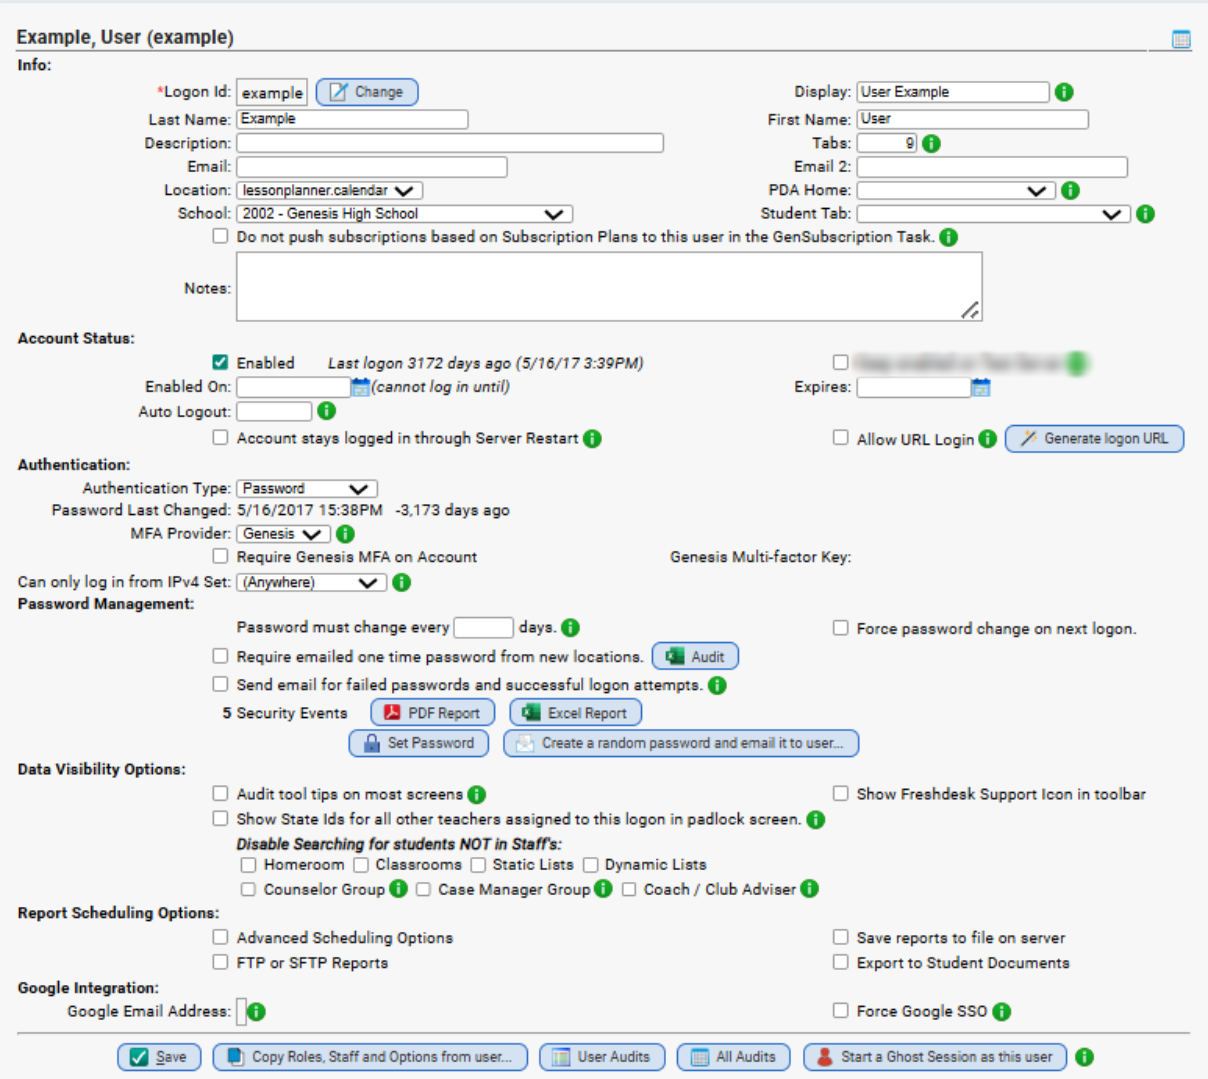
On this screen, you can make various changes/modifications.
- You can assign a staff ID to the logon ID.
- Enable/disable a specific user's logon ID
- Reset a user's password
- Pull up their specific audit information (Security Events)
- Update their name, email address, default screens, MFA, SSO etc.
- Add/delete/change the roles assigned to their logon ID
- Set the "data visibility" to limit which groups of students a user can search/access
- Set their "Report Scheduling" options
Fields
| Option | Notes |
| Logon ID | The ID used to log in to Genesis. |
| Display | If filled in, this value will show as display name when a user receives an email from the user (e.g. If Display Name is set to John Smith, then email will show in inbox as 'John Smith ' rather than just 'jsmith@edu.com') |
| Last Name / First Name | User's First Name / Last Name |
| Description | |
| Tabs | The number of module tabs that appear at the top of the screen before requiring the user to click on Next or Previous tab buttons. |
| User's email address | |
| Email 2 | |
| Location | This is the screen that a user gets upon first logging in to Genesis |
| PDA Home | This is the home screen in the PDA module that a user is automatically sent to after logging in with a mobile device. |
| School | The User's default school in Genesis |
| Student Tab | This is the default tab that is selected from the Student Data>Student List screen. |
| Do not push subscriptions based on Subscription Plans to this user in the GenSubscription Task | If checked, subscriptions based on Subscription Plans will NOT be automatically pushed to this user in the nightly GenSubscription Task. |
| Notes | Internal notes about the account |
| Account Status Options | |
| Enabled | Check this to enable the account. Uncheck it to disable the account. |
| Enabled On | Set a date to enable the account |
| Auto Logout | Number of seconds of inactivity before Genesis automatically logs the user out. The default value of 3600 seconds is used if the field is blank. Note: System-wide setting can be set via Setup>Security>Policy. |
| Expires | |
| Account stays logged in through Server Restart | This setting is best used for kiosks that are used everyday. |
| Allow URL Login | Must also be enabled on Setup>Districts>Master District Parameters>Basic Params |
| Authentication Settings | |
| Authentication Type | |
| Password Last Changed | |
| MFA Provider | Multi-Factor Authentication providers are configured on the Setup.Security.Single Sign-on / MFA screen. NOTE: Genesis MFA will only be activated after using the self setup process on the User Options screen. |
| Require Genesis MFA on Account | |
| Can only log in from IPv4 Set | |
| Password Management | |
| Password must change every X Days | |
| Force password change on next logon | |
| Require emailed one time password from new locations | |
| Send email for failed passwords and successful logon attempts | The Email field must be filled in for this feature to work |
| Security Events | Download a PDF or Excel file of all the security events (such as logons, bad passwords) for the Logon ID. |
| Data Visibility Settings | |
| Audit tool tips on most screens | Allow users to see popup audit dialog boxes that will show who or what task created or last updated the data. The audit popup also has a link to the data dictionary. |
| Show State Ids for all other teachers assigned to this logon in padlock screen | |
| Disable Searching for students NOT in Staff's | Homeroom, Classroom, Static Lists, Dynamic Lists, Counselor Group, Case Manager Group, Coach/Club Advisor |
| Report Scheduling Options | |
| Advanced Scheduling Options | |
| FTP or SFTP Reports | |
| Save reports to file on server | |
| Export to Student Documents | |
| Google Integration Settings | |
| Google Email Address | |
| Force Google SSO | |
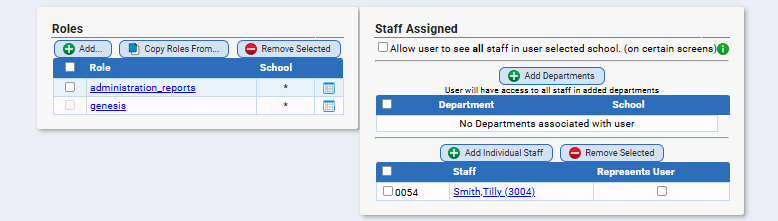
| Roles | |
| Add | To add a new role to the logon ID, click "Add," search for the role, check it off, and click "Add" once more. This grants access to all the securable locations listed in the role. |
| Copy Roles From | If there is another user that you simply want to copy all the roles from, you can use the "Copy Roles From" button, select the user, and click "Copy." |
| Staff Assigned | |
| Add Departments | |
| Add Individual Staff | Add the Staff ID to the User's Logon ID with the "Add Individual Staff" button. This ties to the two together within Genesis. |
| Represents User | Check off the Staff ID listed that represents the user. |
FAQ
How do I set up Two-Factor Genesis SIS MFA?
How do I add a new role to a user?
You go to the Setup>Security>Users and perform a search. Once the logon ID you need appears, click into it.
From there, locate the "Roles" area in the bottom left. You can then add and remove Roles as needed. There is an "Add" button to add new ones.
After you click the "Add" button, a pop up will appear that will allow you to search for the Role you want to add.
Note: If you are not familiar with the Roles and what access they contain - you can review them via Setup>Security>Roles.
How do I set them as "Represents User"?
You go to the Setup>Security>Users and perform a search. Once the logon ID you need appears, click into it.
From there, locate the "Staff Assigned" area. If no staff ID is added, first click "Add Individual Staff" and search for their name and add it in.
After it's added, you can check off the "Represents User" box next to the name.
How do I reset their password?
You go to the Setup>Security>Users and perform a search. Once the logon ID you need appears, click into it.
You can click the "Set Password" button to enter a manual password for them.
Note: If you want the user to then be forced to change and select their own password after logging in, also check off the "Force password change on next logon" and save.
Was this article helpful?
That’s Great!
Thank you for your feedback
Sorry! We couldn't be helpful
Thank you for your feedback
Feedback sent
We appreciate your effort and will try to fix the article