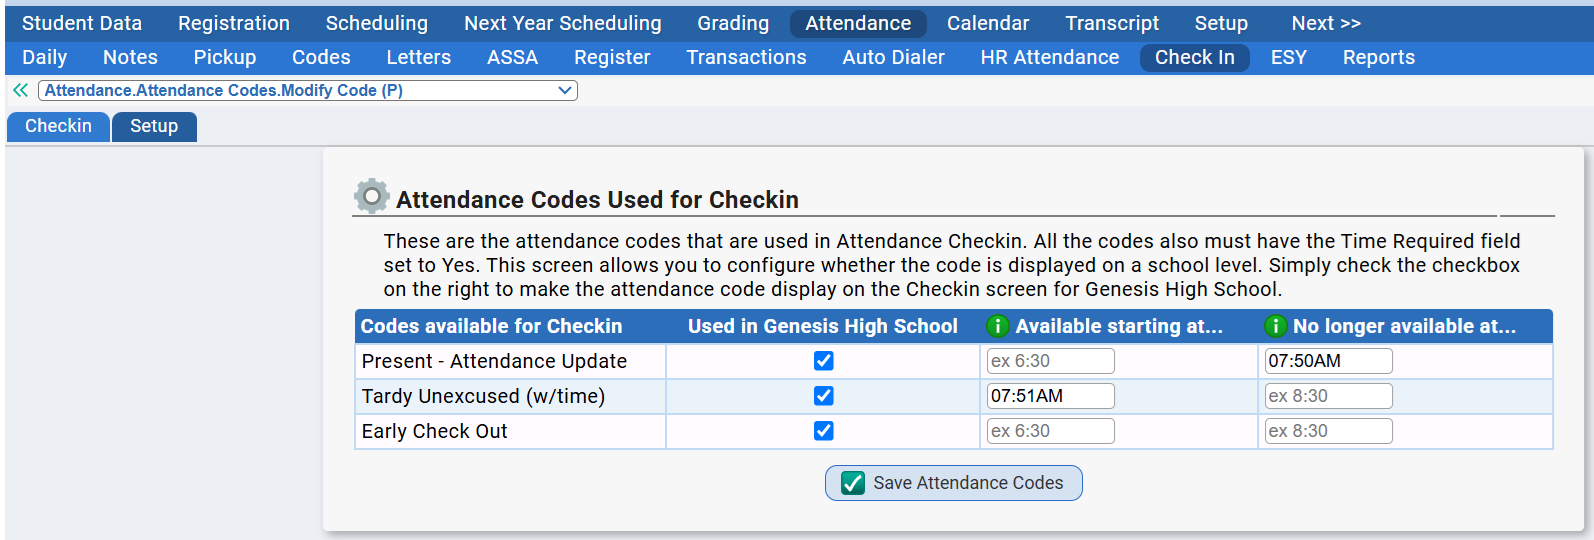
New Features: • On the Attendance>Checkin>Setup screen, there are 2 new fields for the attendance codes that have been selected for checkin. There is now "Available starting at" and "No longer available at" fields that can be filled in with a time. These fields control if a code will be available for the checkin during a checkin. For example, if you would like a Tardy Code 1 to be available until 8:00am, you would enter 8:00am. If you would like Tardy Code 2 to appear in its place, you would enter in 8:00am for that code in the "Available starting at" field. Prior to 8:00am, Tardy Code 1 would be available while Tardy Code 2 would not be available. Once 8:00am hits, Tardy Code 1 would no longer be available while Tardy Code 2 would be available. |
TABLE OF CONTENTS
Overview
The Attendance Check-In is configured, for each school, on the Attendance>Check-In>Setup screen.

- The top area allows you to select the Attendance Codes to be used for Check-In at the selected school.
- The bottom panel configures how Check-In will work at the school.
- The school's options you are editing is based on the school you have selected at the top of your screen
Attendance Check-In Screen Options

Option | Notes |
Display On Screen Keyboard | |
Auto hide keyboard after search | The keyboard disappears from the screen after a student search is performed |
Disable confirm attendance code popup | The confirmation window that pop's up after you select an attendance code will no longer pop up |
Show student picture after Checkin | The student's photo can be displayed on the Check-In screen after they have checked in, along with the check-in information |
| Show student scheduled location after Checkin | |
Hide scan message and/or picture after X seconds | This controls how long the message (and optional photo) is displayed for. If it is blank or set to zero, the message and photo is displayed until the next student needs to check-in. If there are a positive number of seconds listed (e.g. 7) the message and optional photo should disappear after the specified number of seconds. |
If Discipline Incident created, show conduct information in scan message | |
If student has attendance that prevents checkin, display this message | Custom text |
Only allow checkins from students in this student list | You can restrict it to students within a student list |
DO NOT allow checkins from students in this student list | With a student list selected here, all students within that student list will NOT be allowed to check in. |
DO NOT allow students with this User Flag to check in | With a user flag selected here, all students with that user flag assigned will NOT be allowed to check in. |
Bypass code selection screen if school has only 1 Attendance Code for Checkin | If only a single Attendance Code is selected for Check-In in the school, this option, when checked, will cause the Code Selection screen to be suppressed (since there is no need to select the Code). The message screen will be displayed immediately after check-in. |
Attendance total will display for | This gives the option to display the student's attendance totals for the Full Year, Semester 1 or Semester 2, Q1-4. Any or all of the options can be selected, or not. |
School Codes to include in student search | The Check-In screen always searches the roster of students enrolled in the school selected in the screen header. This text field allows you specify codes for additional schools to search. Enter a comma-separated list of additional schools. This is useful if multiple separate schools are contained in a single building. |
Student Pass Options - Can also be setup on the Setup>Schools>Passes>Attendance Checkin screen | |
Generate and display a student pass on the Attendance Checkin Screen? | |
Use the builtin attendance pass instead of the Default student pass? | |
Use this appointment location | |
Use this appointment reason | |
Kiosk Mode Silent Printing - Allows passes to be automatically printed on check out | |
Automatically print pass on checkin | This setting will automatically launch the print dialog for the displayed pass when it is shown. If silent printing is enabled in the browser the pass will be immediately printed. The below link explains how to enable silent printing for chrome, firefox, and edge. (Browser MUST be in Kiosk Print mode to function) |
Time limit on Pass Display (blank for no limit) | |
Marking Attendance Codes Usable for the Check-In Screen
Step 1: Marking Attendance Codes to Allow them to be Used for Check-In
Go to the Attendance>Codes screen.
- Identify a Code you want to make available for the Check-In screen and click the modify button for it. This brings up the "Modify Code" screen.

- Locate the "Use for Check-In screen" and set it to "Yes".
- Click the 'Save Attendance Code' button
- Repeat with additional codes that you wish to make available for Check-In.
Step 2: For each School, Choose the Attendance Codes for Check-in at that School.
- Make sure the School you are setting up for is selected in the screen header
- Go to the Attendance>Check-In>Setup screen.
- At the upper part of the screen, locate the "Attendance Codes Used for Check-In" section:
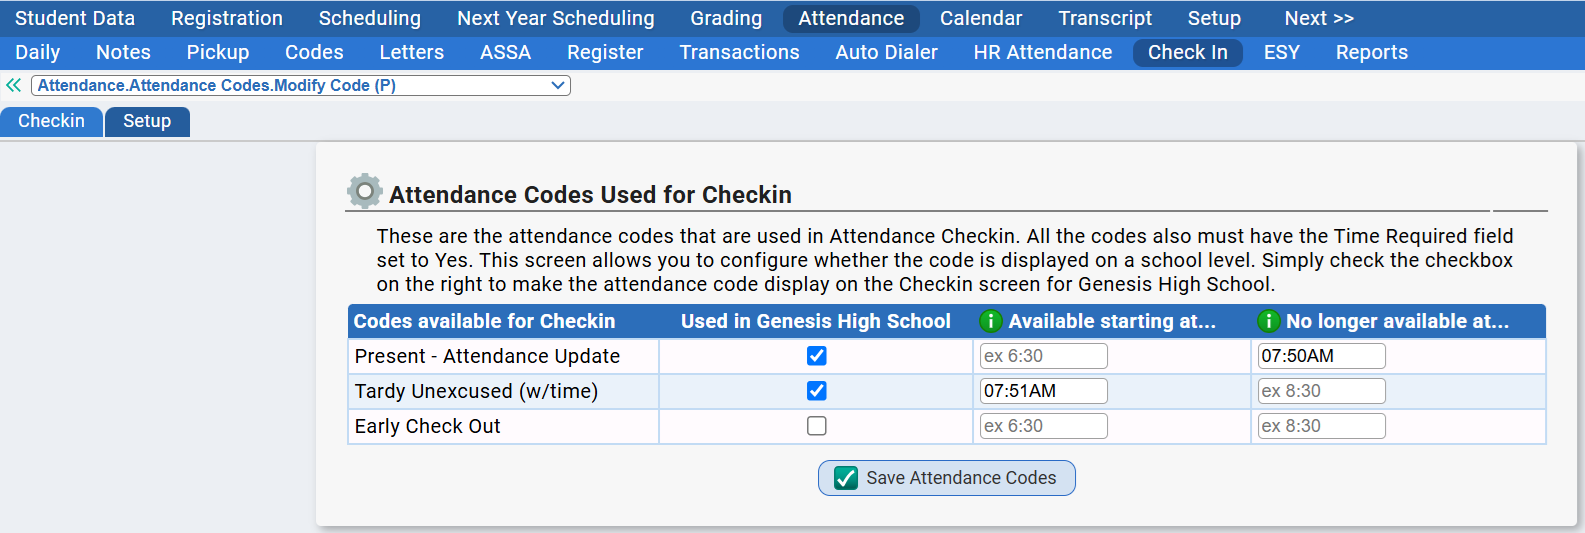
- All of the Codes you have made available for Check-In in Step 1 above should appear here. Check the checkboxes for the ones you want to use for the selected School.
- If you wish to control which codes appear at different times of the day, use the two time fields, "Available starting at..." and "No longer available at ..." to specify when the codes should appear. Additional information is found here.
- Click Save Attendance Codes to store your choices.
Was this article helpful?
That’s Great!
Thank you for your feedback
Sorry! We couldn't be helpful
Thank you for your feedback
Feedback sent
We appreciate your effort and will try to fix the article