TABLE OF CONTENTS
- Turnstile Scanning
- Logging In as a Turnstile User and Checking-In Students
- Using Auto Checkout
- Additional Articles
The Turnstile Scanning Screen
This is found via Turnstile>Scanning.

Your logon ID and events need to be set up and connected for this screen to display.
Click back to the previous articles for this info:
Turnstile Scanning
The Turnstile>Scanning screen provides a streamlined, quick way to check students in to an event.
The top portion of the screen is used to select the student – either by their student id or by their last name.
Checking In a Student
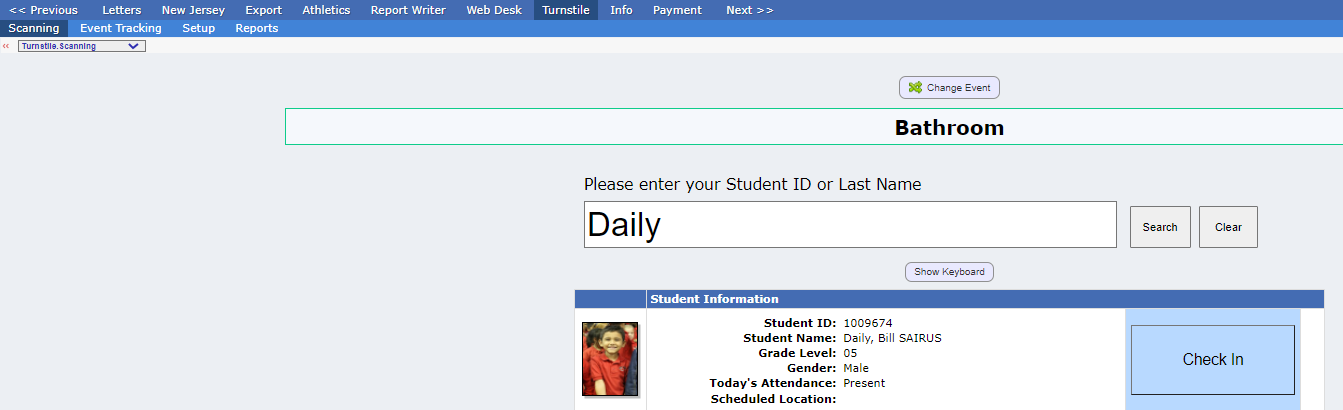
Procedure to Manually Check-In a Student
- Go to the Turnstile>Scanning screen
- Enter all or part of the student's name or enter their student id
- Click the "Search" button. This locates students who match the entered criteria.
- To check-in a student, click on the "Check-In" button corresponding to that student. This may bring up a "Select Reason" screen, if the event is set up to have reasons.
This screen contains one large button for each available check-in code:
- If there is no reason, clicking "check in" will be all that you need to do.
- If your system is configured to print Attendance Passes, your Attendance Pass will now be displayed and can be printed out.
Logging In as a Turnstile User and Checking-In Students
Procedure to login as the Check-In User and Initiate Check-In
- Bring up a browser and navigate to your Genesis URL. Login as the new Check-in User.

- Check-In can now begin. You can also click the
 "Maximize Screen Size" control on the upper right to remove the Genesis header and only display the check-in area:
Procedure to Logoff as Check-In User
- If the screen is 'maximized', click the
 "Normal Screen Size" control on the upper right to redisplay the Genesis header.
 - Click the
 Logoff icon in the upper right. This displays the "Confirm Logoff" dialog box:
- Click OK to logoff.
A Check-In User with no Event Setup
If no event has been configured for a check-in user, the Turnstile>Student Scanning screen will display the following message:

The Turnstile.Student ScanningScreen with "No Event Configured" message
To fix this, use a "Configuration User" to setup an Event for this check-in user.
Click here for info on Silent Print and Kiosk Mode
Using Auto Checkout
Types of Auto Checkout
There are three kinds of auto checkout for Turnstile Events:
- Auto Checkout at the end of the current period.
- Auto Checkout at a specific set time.
- Auto Checkout when being checked into another Turnstile event.
Two of these are configured on the Turnstile>Setup>Turnstile Templates screen and the last is set on the Event definition itself, on the Turnstile>Setup>Turnstile Events screen.
Auto Checkout at Period End
This is useful for event types such a "Library" (i.e. media center) or 'cafeteria', which students generally leave en masse at the end of a period.
This setting will check out all students currently checked in to the event.
This is set on the Turnstile>Setup>Turnstile Templates screen when an Event is configured for a particular user: The control for it is found at the bottom of the "Search Settings" section:

The "Automatically check out students in the next period" control this. This applies ONLY to "student" events, not to staff events.
Auto Checkout at a Set Time
A second type of auto checkout can be set at the top of the screen:
The "Set departure time when students check in to this event" allows you to specify the departure time for all students or staff checking in to the event. The departure time is entered at check-in - that is, it is preset in the check-in record. The student is considered "checked in" between the arrival time and the specified check-out time. "Check-out" becomes effective at the specified time. NOTE: Students may still choose to check out early with this option set. Students who checkout prior to the set departure time will have this time overwritten by the actual time of checkout.
The "departing time" is a specified fixed time. To adjust it (e.g. set it to later), the "Set departing time when students check in to this event" field here on the Turnstile>Setup>Turnstile Templates screen must be updated. Time is not automatically adjusted - no formulas can be used here.
Auto Checkout when Checked into Another Event
The third kind of Auto Checkout controls event persistence, or the ability of students to be checked into multiple events simultaneously.
This is set on the definition of the event on the Turnstile>Setup>Turnstile Events screen:

The "Auto Checkout" setting on each Turnstile Event controls whether students and staff are automatically checkout of the event if they check into another event. For example, if a student is checked into "Corridor", and Corridor does NOT have Auto Checkout checked, the student can check into and out of some other event (e.g. "Bathroom") while remaining checked into "Corridor". This allows the "Corridor" event to persist, regardless of where else a student checks into and and out of, while they remain checked into "Corridor".
This is good for tracking students during overarching situations, such as being out of their classroom, or being on a field trip.
Additional Articles
Logging In as a Turnstile User and Checking-In Students
Mass Adding Users to a Turnstile Event
Printing Passes on Turnstile Checkout
Was this article helpful?
That’s Great!
Thank you for your feedback
Sorry! We couldn't be helpful
Thank you for your feedback
Feedback sent
We appreciate your effort and will try to fix the article