TABLE OF CONTENTS
- Overview
- Setup Parents/Student Module
- Options
- Seeding the Directory
- Genesis Parents and Students
- Curriculum Catalog
Overview
The School Directory in the Genesis Parents Module is an easy way for parents and students to look up the contact information of students and parents in the school.
Parents are provided with the ability to remove or add any contact information listed in Genesis.
Here's a breakdown on how it all works.
Setup Parents/Student Module
By default, the School Directory is not available to your users. Parents and students cannot see any contact information until you decide to let the users have access.
The first place to start is on the Parent Access>Setup>Settings>School Settings>School Information screen. This is where you can setup what contacts and the content to be displayed.
If you do not want to show the student contact's or if you have a need to display contact information not being shown on the screen (ie. Staff Information) on the screen, you can upload a PDF into Genesis.
If a PDF is uploaded, then a link will be shown on the School Directory screen that the parent can click to view the file.
Options
Field | Values | |
Contact Display | This field allows you to control what contacts a parent or student is allowed to see in the school directory. By default, users are allowed to see all published contacts in the student's school. You can also set the directory to only show contact information for the student's grade level or the student's homeroom | |
Default Sort | This controls how the directory is displayed to the users. By default, the directory is listed by grade level but you can also set this to show by homeroom or simply by student name. | |
Contact Fields | This controls what contact information can be displayed in the directory | |
Optional Fields | Options: Link to Maps, Student Gender, Student Nickname, and Contact Relationship | |
Section Display | By default, users are presented with the published contacts that they are allowed to view. This can be changed to "Only show PDF", which will only display a link to an uploaded PDF or "Show PDF and contacts", which will display all published contacts as well as a link to the uploaded PDF. | |
Load a PDF to be displayed as your school directory |
Seeding the Directory
Mass Publish Contact Information
Under the School Directory Tools section of the screen, you can seed your directory in mass by publishing contact information depending on the criteria you select.
By selecting a school and type of contact (Guardian 1, Guardian 2, etc,), the tool will publish the primary number and email address of the contact.
If a student has a custody issue, the tool will not publish any of the contact's associated with the student.
Optional fields can be selected to only publish student's contacts who have a specific user flag checked off or not publish the contacts.
This works well if you have previously collected information from parents about opting into or out of the School Directory.
Manually Publish a Student's Contacts
You can also publish a student's contacts manually from the Student Data>Demographic>Contacts screen by clicking on the "Update Contacts for School Directory" button.
This will popup a box with the student's guardian information.
You can individually select each phone number or email that is attached to the contacts to publish to the directory.
Genesis Parents and Students

The parent's and student's are shown the published contacts for their school, grade or homeroom in order, depending on the setup options selected.
Users have the ability to search the directory by the student's last name and also have the ability to filter the results by clicking on the filter icon next to the search box.
If a parent account does not have any contacts that they have access to published in the directory, then a notification is shown that will inform them of that fact and give the ability to update their phone numbers and/or emails to the directory.
Parents who want to remove some information can do this by clicking on the "Update Contact Information" button.
Curriculum Catalog
We recently added a curriculum catalog screen that will show all catalog files and catalog descriptions for active courses in the student's school. New permission for parent access called "School Curriculum Catalog".
You can upload documents to courses via Scheduling>Curriculum>Modify in the "Curriculum Catalog Files" area:
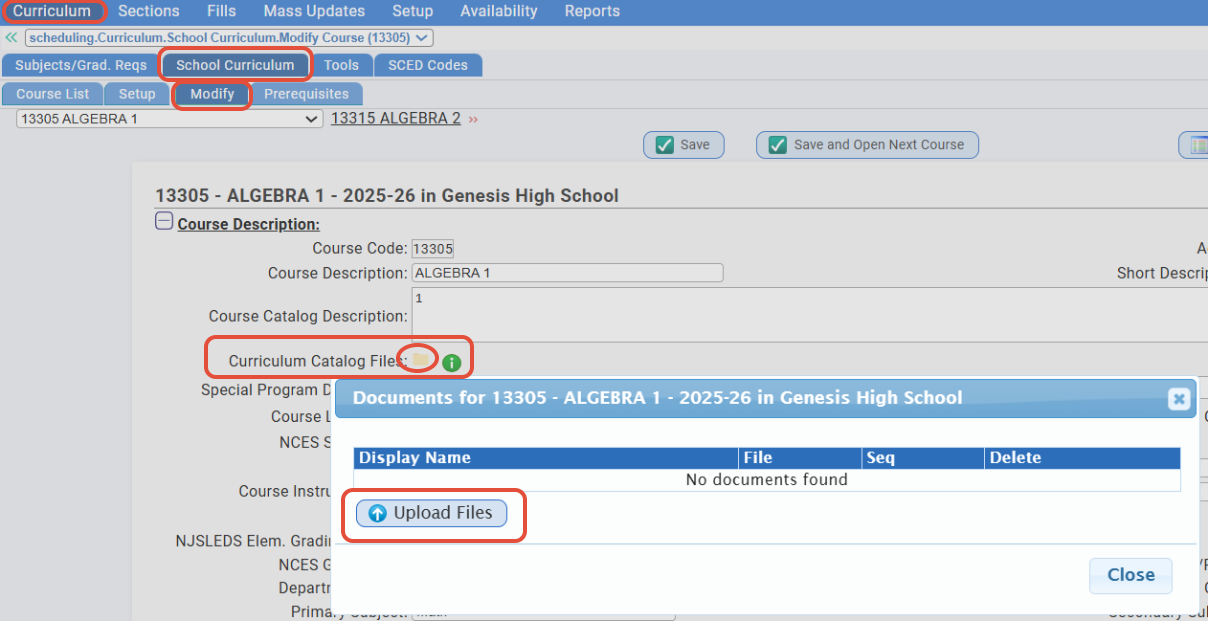
Click the folder icon to upload files that can be accessed on the School Curriculum Catalog screen in the parent portal.
Parent users must have the School Curriculum Catalog permission enabled to view this screen.
Once files are uploaded, display name and sequence can be set.
Files are shown using their display name. If there is no display name, the filename will be displayed.
The sequence field will change the order the files are shown.
Tip: Control click your files to upload multiple at once.
Was this article helpful?
That’s Great!
Thank you for your feedback
Sorry! We couldn't be helpful
Thank you for your feedback
Feedback sent
We appreciate your effort and will try to fix the article