NJ Athletics Health History Update Form
TABLE OF CONTENTS
- NJ Athletics Health History Update Form
- Form Overview: The 90-Day Athletic Health History Update Form
- Installing and Enabling the Health History Update Form Report for Your District
- Genesis' Health History Form Components
- Downloading, Installing and Localizing the Parent Form & the ReportWriter Report
- Running the Health History Form Report
- Creating a Document Management Document Type for Health History Update Forms
- Connecting the ReportWriter Report to the Parent Form
- Altering the Health History Update Form Itself
Form Overview: The 90-Day Athletic Health History Update Form
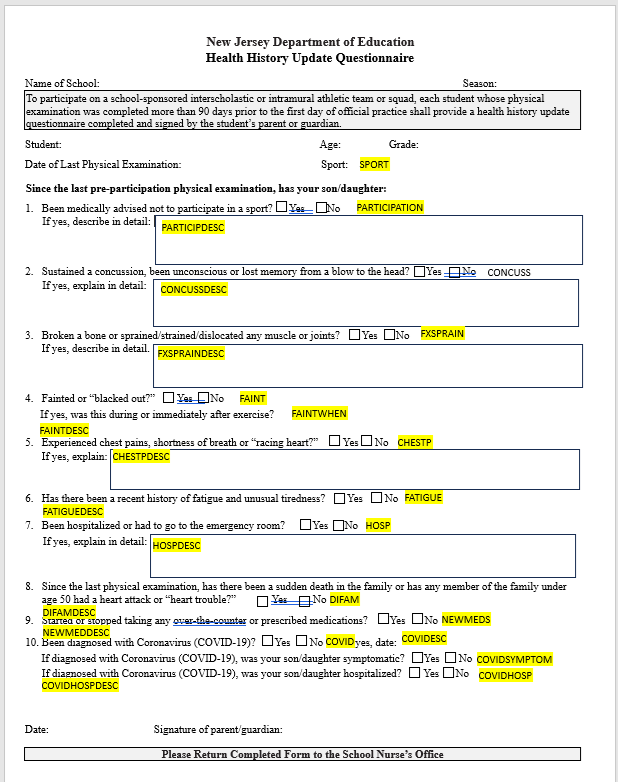
The NJ Athletics Health History Update Form is the "90-Day Form": students must submit this form to be considered eligible to participate in Athletics if their most recent physical exam is older than 90-days.
After parents submit the Health History Update Form, using the Parent Form provided here, the report provided here will create completed PDF forms for the NJ DoE Health History Update form:
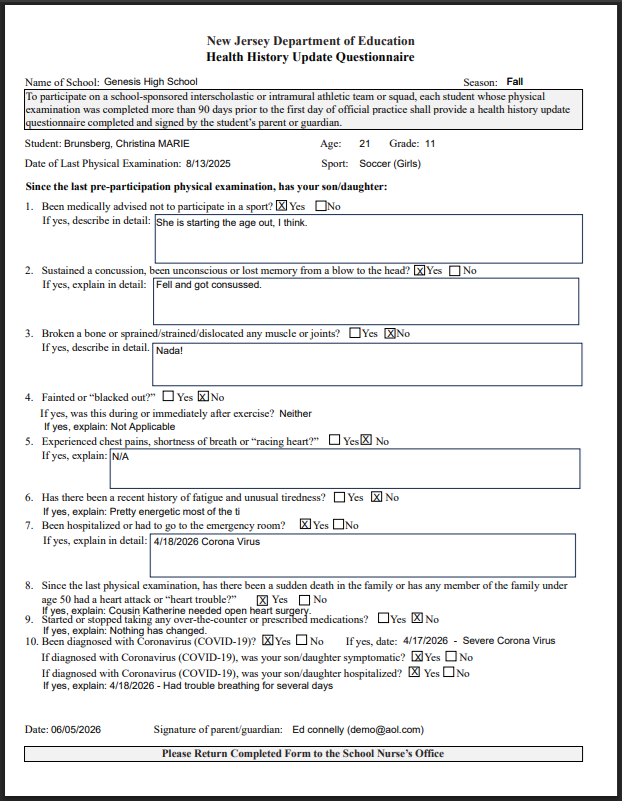
These can be printed out and/or stored on students' Documents screen (Student Data->Modify Student->Documents).
Installing and Enabling the Health History Update Form Report for Your District
Support for the NJ DoE Health History Update Form in Genesis consists of a Parent Form paired tightly with a ReportWriter report. Parents/guardians fill in the Parent Form in the Parent Access module and then the ReportWriter report can be used within Genesis to create PDFs of the submitted forms and optionally store these in students' records.
To enable the Health History Update Form you must install both the Parent Form and the ReportWriter report in your Genesis system, "localize" them so that they will work together on your system, and then make them available to the students, parents and staff who will use them.
The remainder of this article walks you through installing these two components on your system, localizing them, making them available. It then explains how the Parent Form and ReportWriter report are connected - and what you need to do to maintain that crucial connection.
The Procedure - An Overview
Basically what you need to do is:
1. Download the two components: a Parent Form and a ReportWriter report.
2. Install them into your system.
3. Link the uploaded ReportWriter report to the uploaded Parent Form in your system ("localization").
3.a. Do any other 'localization' you want. E.g. add local introductory text to the Parent Form.
4. Publish the Parent Form to the students: Allow parents to fill out and submit the form.
5. Add Role permissions to the report to give access to the staff members who need to run the report to generate the PDF versions of the Health History Update Forms - and optionally store them into the students' records.
6. Use the ReportWriter report to generate the PDF version of the Health History Update Forms and save them to student records.
Genesis' Health History Form Components
The Health History Update Form can be implemented in your Genesis system by downloading, installing AND LOCALIZING both the ReportWriter report and the Parent Form provided here. Caveat: It will NOT WORK to simply load these into your system. You MUST "localize" them as directed below.
Health History Update Form ReportWriter Report - Download Report
This is used to print out the finished Health History Update Forms and to "burst" them out into students' Documents screens.
Parent Health History Update Form - Download Parent Form
This is used to have parents/guardians fill in and submit the Health History Update Form from the Parent Access module.
Downloading, Installing and Localizing the Parent Form & the ReportWriter Report
Downloading and Installing
To download the ReportWrtier report and the Parent Form use the links provided above.
More information can be found about parent forms at the link below:
More Information can be found about ReportWriter Reports at the link below:
Getting Started with Report Writer and Writing Reports
Installing the Parent Form
1. Go to the Parents->Forms->Templates->List screen
2. Locate and click the "Import Form" button. This brings up the "Import Parent Access Form Template" dialog:
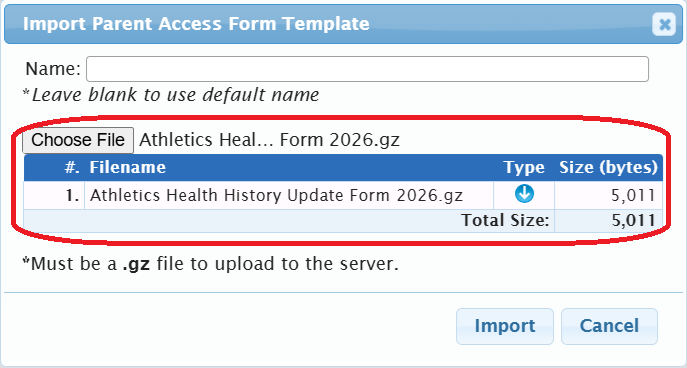
3. Use the "Choose File" file chooser to find and select the downloaded Parent Form.
4. Click Import to upload the form.
Installing the ReportWriter Report
1. Go to the Nurses->Reports screen (or any other Reports screen you want to install the report on).
2. Find and click the "Import a Report" button. This will bring up the Import a ReportWriter Report dialog:
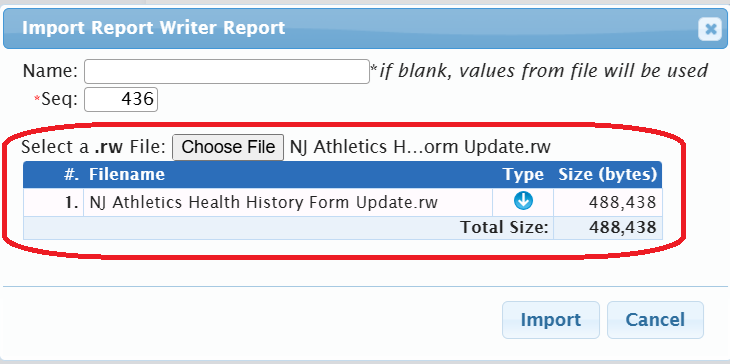
3. Use the Choose File file chooser to locate and select the downloaded ReportWriter report.
4. Note the "Seq" - this becomes the key part of the Report #. The Seq of 436 shown above becomes report 990436.
4. Click the Import button to import the report.
Setting Role Permissions to Give Local Users Access
To distribute access to the ReportWriter report, add Roles to the Report. This is done on the bottom of the
Report Info" screen of the ReportWriter report:
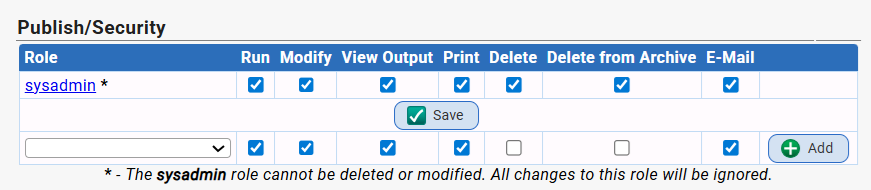
Access must be given to anyone who will need to run the report.
To distribute access to the parent form - if you need to - the Role permissions are found at the bottom of the Parent Form's "Template" screen:
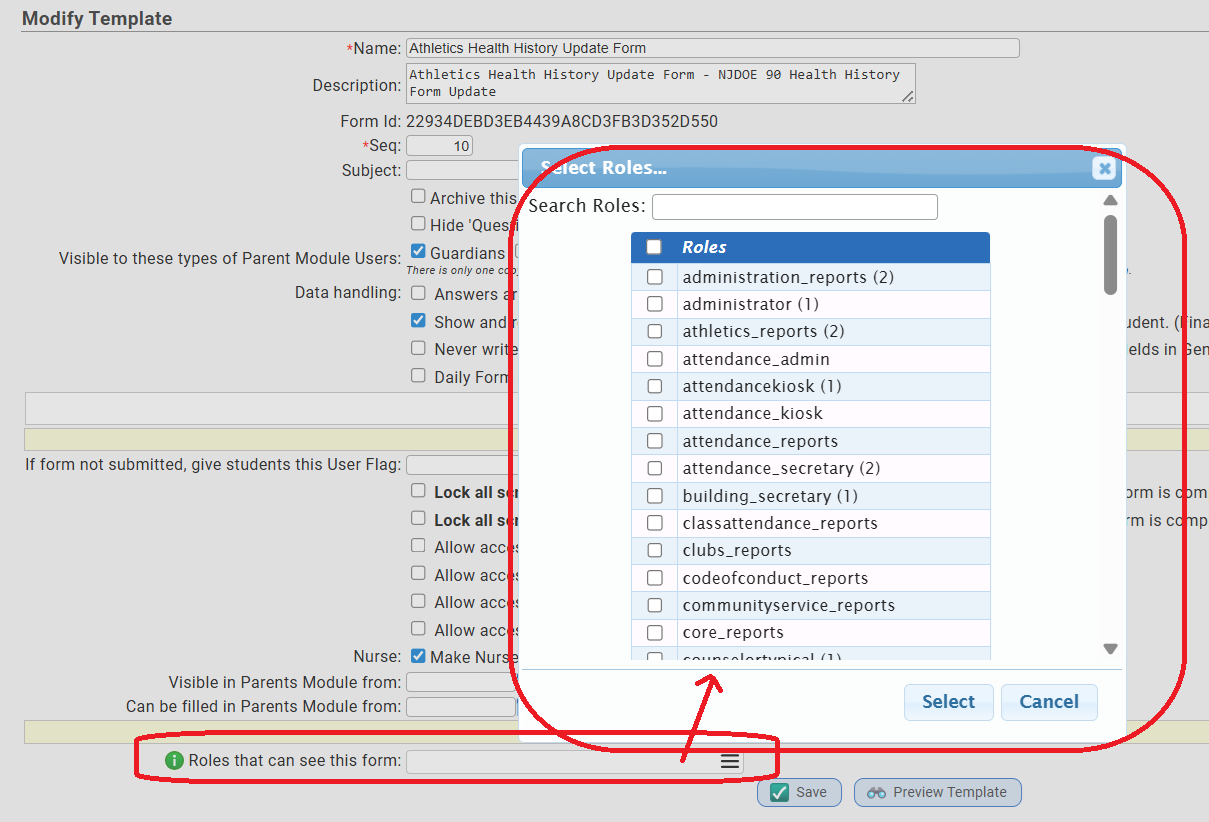
Access to the parent form need only to be given to users who will need administrative access to the form itself. Users who will see the completed "PDF Forms" generated by the Report do not need access to the Parent Form.
Publish the Parent Form to Students
The selection of the students whose parents/guardians will see the report is defined on the "Selection of Students" screen of the Parent Form:
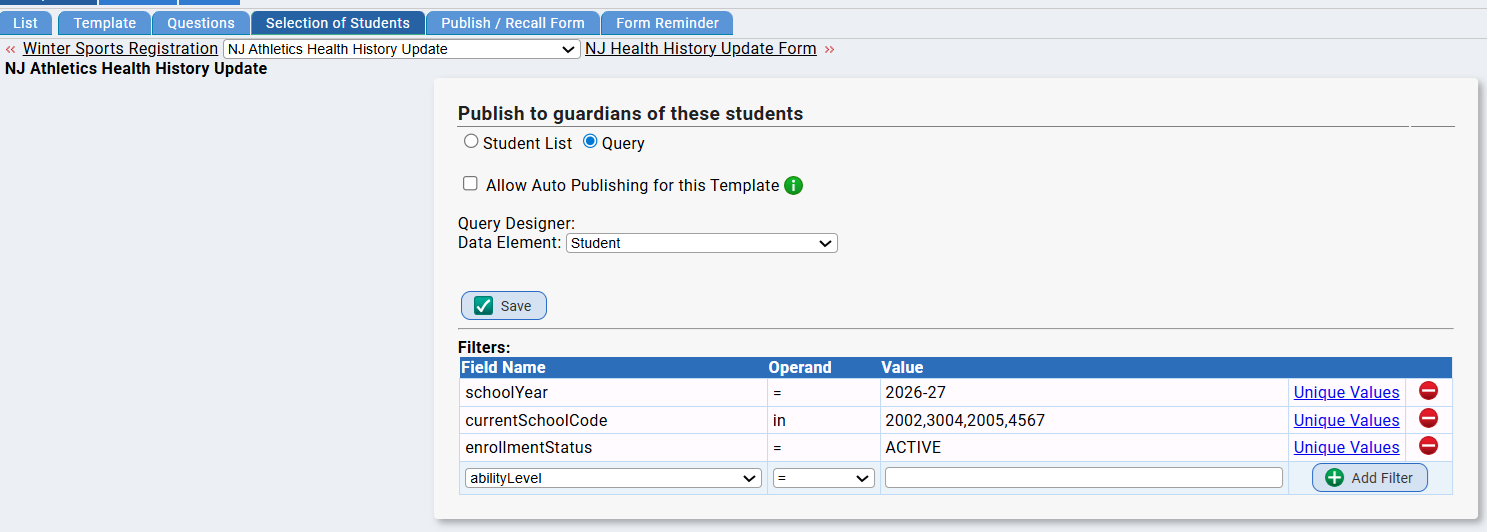
Who receives the form is completely up to the choices made at your local district.
Localizing the ReportWriter Report: Linking the ReportWriter Report to the Parent Form
As installed, the ReportWrirter report will NOT be able to get data from the Parent Form. It must be 'localized' to be tied to the Parent Form in your Genesis system. The ReportWriter report must be updated to have the "Form ID" for the local version of the health history update Parent Form. Otherwise it will not work.
The absolute crucial thing you must do to "localize" the ReportWriter report is to find the "FORM ID" for the Parent Form you just installed and get it wired into the ReportWriter report.
Procedure to Find the FORM ID for the Parent Form and Install it into the ReportWriter Report
1. Go to the Parents->Forms->Templates->List screen and find the installed form.

If you changed the name of the form when you uploaded it,it will have that name, not the name shown here.
2. Edit the form: click the "edit" icon button. This brings up the "Questions" screen of the Parent Form. Click the "Template" 3rd level tab insteand:

3. Click "Template" will take you to the "information" or profile screen for the Parent Form. What you want to do here is locate the "Form ID" field and simply copy the very long "Form ID":
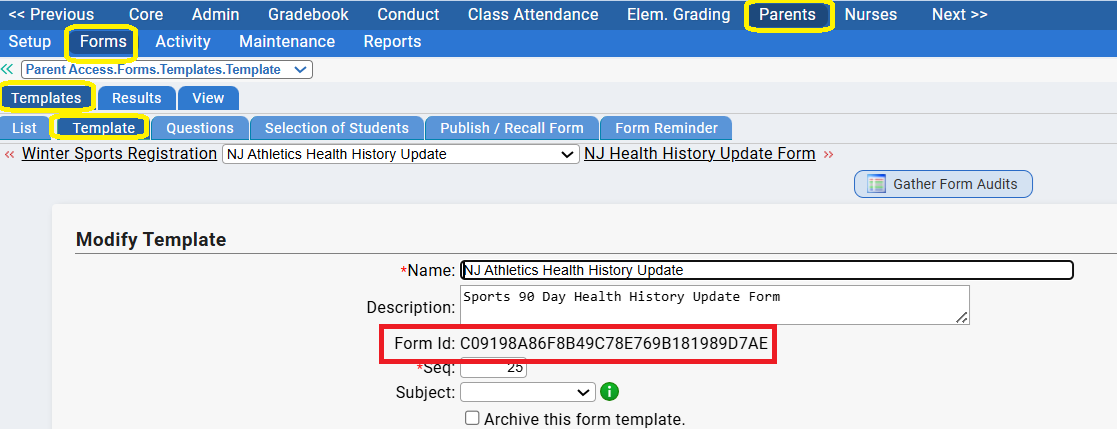
4. Copy just the long id - not the words "Form Id:". Now you have to install that long numeric ID in the ReportWriter report.
5. Now go to where you installed the report (e.g. go to the Nurses->Reports screen - or wherever you installed the report.) Locate the report:
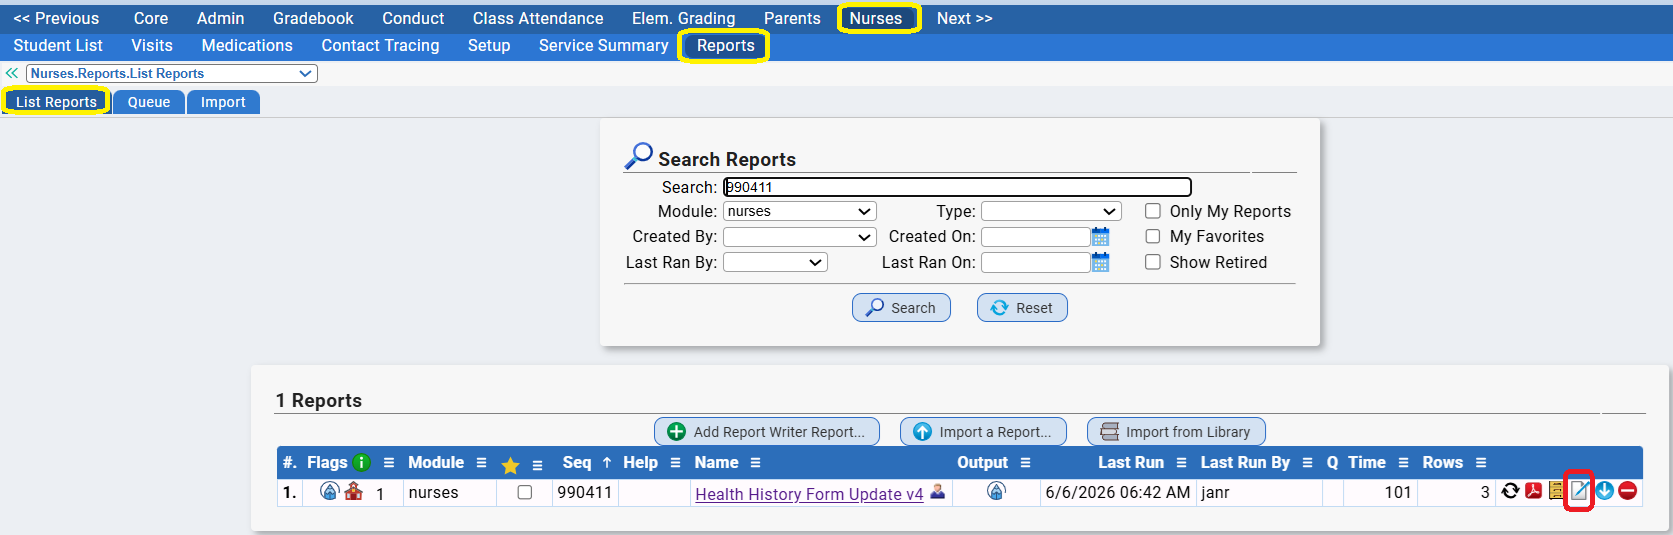
6. Click on the 'edit' icon to open the report for editing.
7. Once the report is open, click on the "3. Report Parameters" tab of the Report:
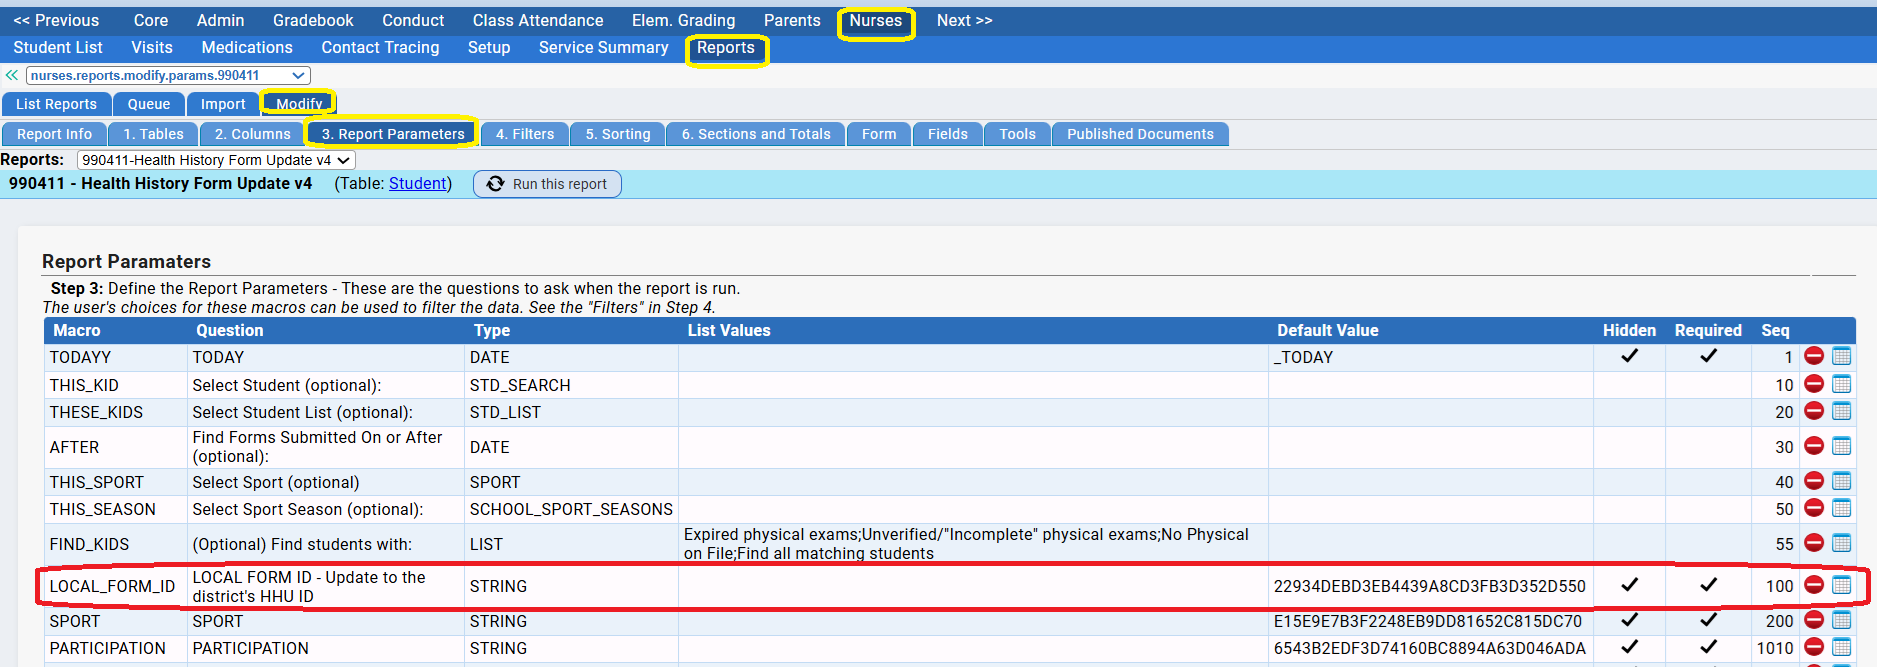
8. Locate the "LOCAL_FORM_ID" parameter. You will need to replace the existing "LOCAL_FORM_ID" parameter with a new one with the long "Form ID" you copied in Step 4 above. To do that do steps 9 to 12:
9. DELETE the LOCAL_FORM_ID parameter. Scary, yes, I know, but you will immediately replace it.
10. Scroll down to the "Add a Parameter" section at the bottom:

11. Create the new LOCAL_FORM_ID parameter:
Enter "LOCAL_FORM_ID" in the Question area.
Leave "Filling in a text field" as your "User answers by"
Enter LOCAL_FORM_ID in the Macro area. Make sure it is exactly right.
Check the "Required?" and the "Hidden" checkboxes
Set the "Seq" number to 100 (this will help you in the future).
Paste the long "Form ID" into the "Default Value" field
You should have something that looks like this - with your local form's code, not the one shown here:

12. Click "Add This Question" to re-add the LOCAL_FORM_ID parameter. You have now attached the form on *your* system to the ReportWriter report on your system.
You are Done!
Once there are some "submitted" Health History Update Forms you will be able to use the Report to print them out.
Other Localizations
You can add local questions to the Parent Form or edit the introductory text to personalize it to your district.
- Do NOT delete and recreate any "Health History Questions" - the Questions are tightly tied to the ReportWriter report. Replacing them will not automatically update the report.
- You can add questions but these will NOT print on the Health History Update Forms.
- You can change the "Answer Type" of existing questions - for example if you want to change the Sports Season for the "Select a Sport" question. As long as you do not replace the question, you only change the "Answer Type", the report will still work.
- Replacing questions will break the report.
Running the Health History Form Report
Once parents/guardians have filled in and submitted forms, the ReportWriter report provided here, once it has been 'localized' for your district, can be run to produce PDFs of the finished forms.
Report Parameters
There are seven report parameters:

All of the parameters are optional:
- Select Student - This allows you to select one specific student for whom to run the report. If there student has multiple Health History Update Forms for the current school year, all of their forms will be included in the output.
- Select Student List - This allows you to select an entire "student list" of students. Students will be included in the output only if they actually have at least one Health History Update Form for the current school year. Students on the list with no current year Health History Update Forms will not be inlcuded in the output.
- Find Forms Submitted On or After - Only include forms that were created on or after the specified date.
- Select Sport - Only find forms where the selected sport was chosen. E.g. if "Football" is selected, only forms where "football" was the selected sport will be included. A sport must be chosen for each entered form.
- Select Sport Season - Only find forms where the sport chosen on the form takes place in the selected season.
- Find students with- This parameter references the students' underlying Physical Exam - not the health history update form itself. The options for this parameter include:
- Expired Physical Exams - The student has a physical exam on file but it is older than 365 days.
- Unverified/"Incomplete" Physical Exams - The student has a physical exam on file, it is younger than 365 days (1 year) but it has never been marked "completed". That is, it was never reviewed and approved by a nurse (at least not approved within Genesis). Students are not eligible to participate in athletics/sports until they have a 'verified' ("Completed") physical exam.
- No Physical on File - The student has no physical exam on file in their Genesis record.
- Find all matching students - All students matching all of the other criteria are returned. This is the equivalent of leaving the parameter blank.
Running the Report: Choosing Parameters
If you do not select any parameters, the report will print Health History Update Forms for all students in the currently selected school (in the screen header) whose parents/guardians submitted a form via the corresponding Parent Form. In other words, it prints all of the submitted forms it finds in the corresponding Parent Form.
Entering any parameter will restrict either the students to search for or the forms to search for.
The report creates a single PDF file with all of the forms it has found in the corresponding Parent Form.
If no forms matching the entered parameters are found in the corresponding Parent Form, a single blank Health History Update Form will be printed. It will not say "no forms found" - it simply prints a single empty form.
"Bursting" the Health History Form to Students' Document's Screen
The health history update forms produced by the report can be stored on the individual students' Documents screen (Student Data->Modify Student->Documents).
To make a permanent PDF copy of a submitted form and store it into the individual student's record, when you run the ReportWriter report you can "burst" the PDF forms out to the students' Documents screen (Student Data->Modify Student->Documents) as PDF files. These are then "frozen" - they are permanent (unless you manually delete them) - they no longer depend on the submitted Parent Form.
To do this, your personal Genesis login must be configured to allow you to store files to students' records. If it is configured to allow you to do this, when you run the report, the following controls will appear:

To store the forms in student records you must select a "Document Type" and enter a Title. The "Document Type" is essentially the 'folder' the forms will be stored in on the students' Documents screen; the "Title" is how they will be labeled (the Title defaults to the name defined in the Document Type).
You can create a "Health History Update Forms" Document Type in Document Management (see below for instructions).
For example:

Optionally, you can make the generated Health History Update Form visible in the Parent Access module by checking the "Visible in parents module" checkbox and choosing to whom it will be visible (Student, Any Guardian, etc).
Once the Health History Update Form report has been "burst" out to student records, it can be found on students' Documents screen in the "folder" labeled with the Document Type:

Information on how to configure user logins to allow forms to be generated for students can be found here.
Creating a Document Management Document Type for Health History Update Forms
A "NJ Health History Update Form" Document Type (or whatever you want to call it) has to be created in the "Documents" Document Management module. Additional information about Document Management can be found here.
1. To create the form, go to the Documents->Setup->Document Types screen:
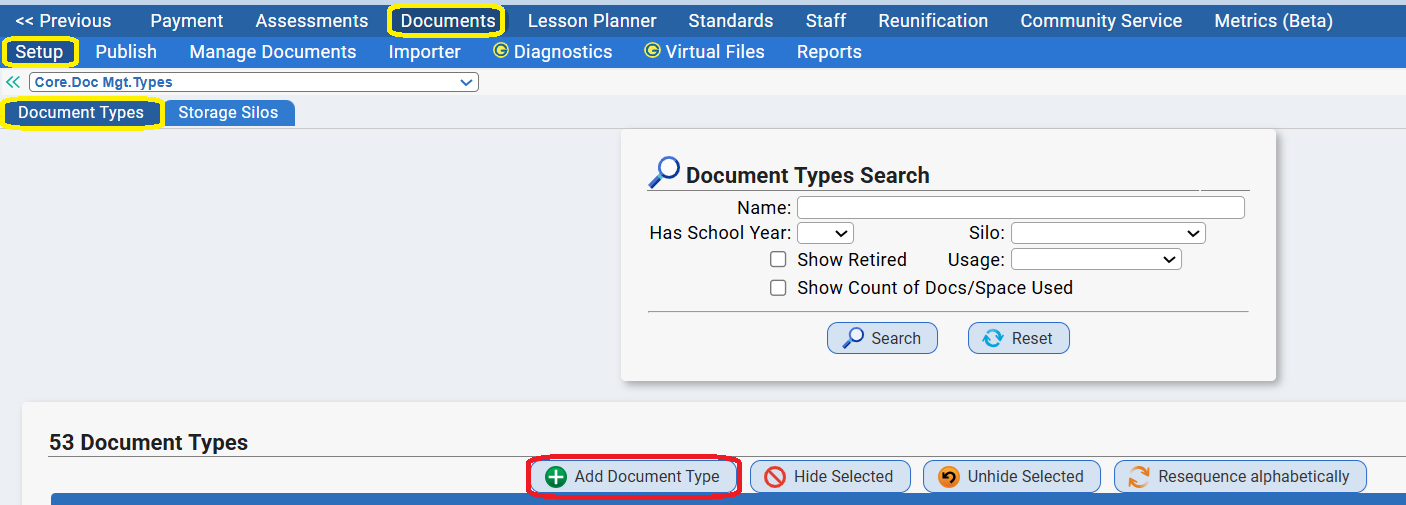
2. Click on the "Add Document Type" button. This will bring up an "Add Document Type" dialog box:
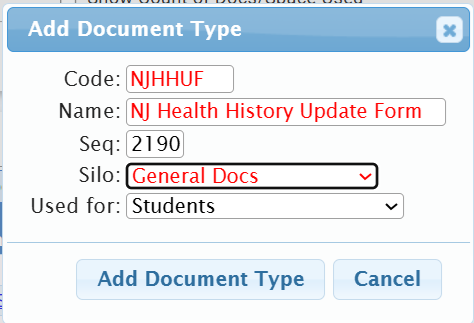
3. Make up a "Code" and a "Name" for your new Document Type. The new Document Type will appear in all "Document Type" drop downs by the name you give it here.
4. Select a storage "Silo" to store these documents in. If there is more than one Silo listed in the drop down speak to your local system administrator to identify which "silo" to use.
5. Click "Add Document Type" to actually create new the Document Type.

Once you create the Document Type, there are two parameters that need to be updated:
- Find the "Allow document to be uploaded as a Student Document" parameter and check it.
- Find the "Can be Health History Form" parameter and check it.
- Scroll to the bottom and click "Save Parameters". You are now done creating the Document Type.
You must also add the Roles you wish to be able to access the form to the "Security Granted to Roles" area at the bottom. This should include the staff members who will run the ReportWriter report.
Connecting the ReportWriter Report to the Parent Form
Parent Forms - and the questions within Parent Forms - are identified by lengthy codes. To access the correct Parent Form and to access the information stored in the questions within a Parent Form, you need to know the lengthy codes which identify the form and its questions.
To make updating the "Parent Form" the ReportWriter report is connected to - and to make updating the questions relatively easy, hidden parameters have been created on the report's Parameters screen:
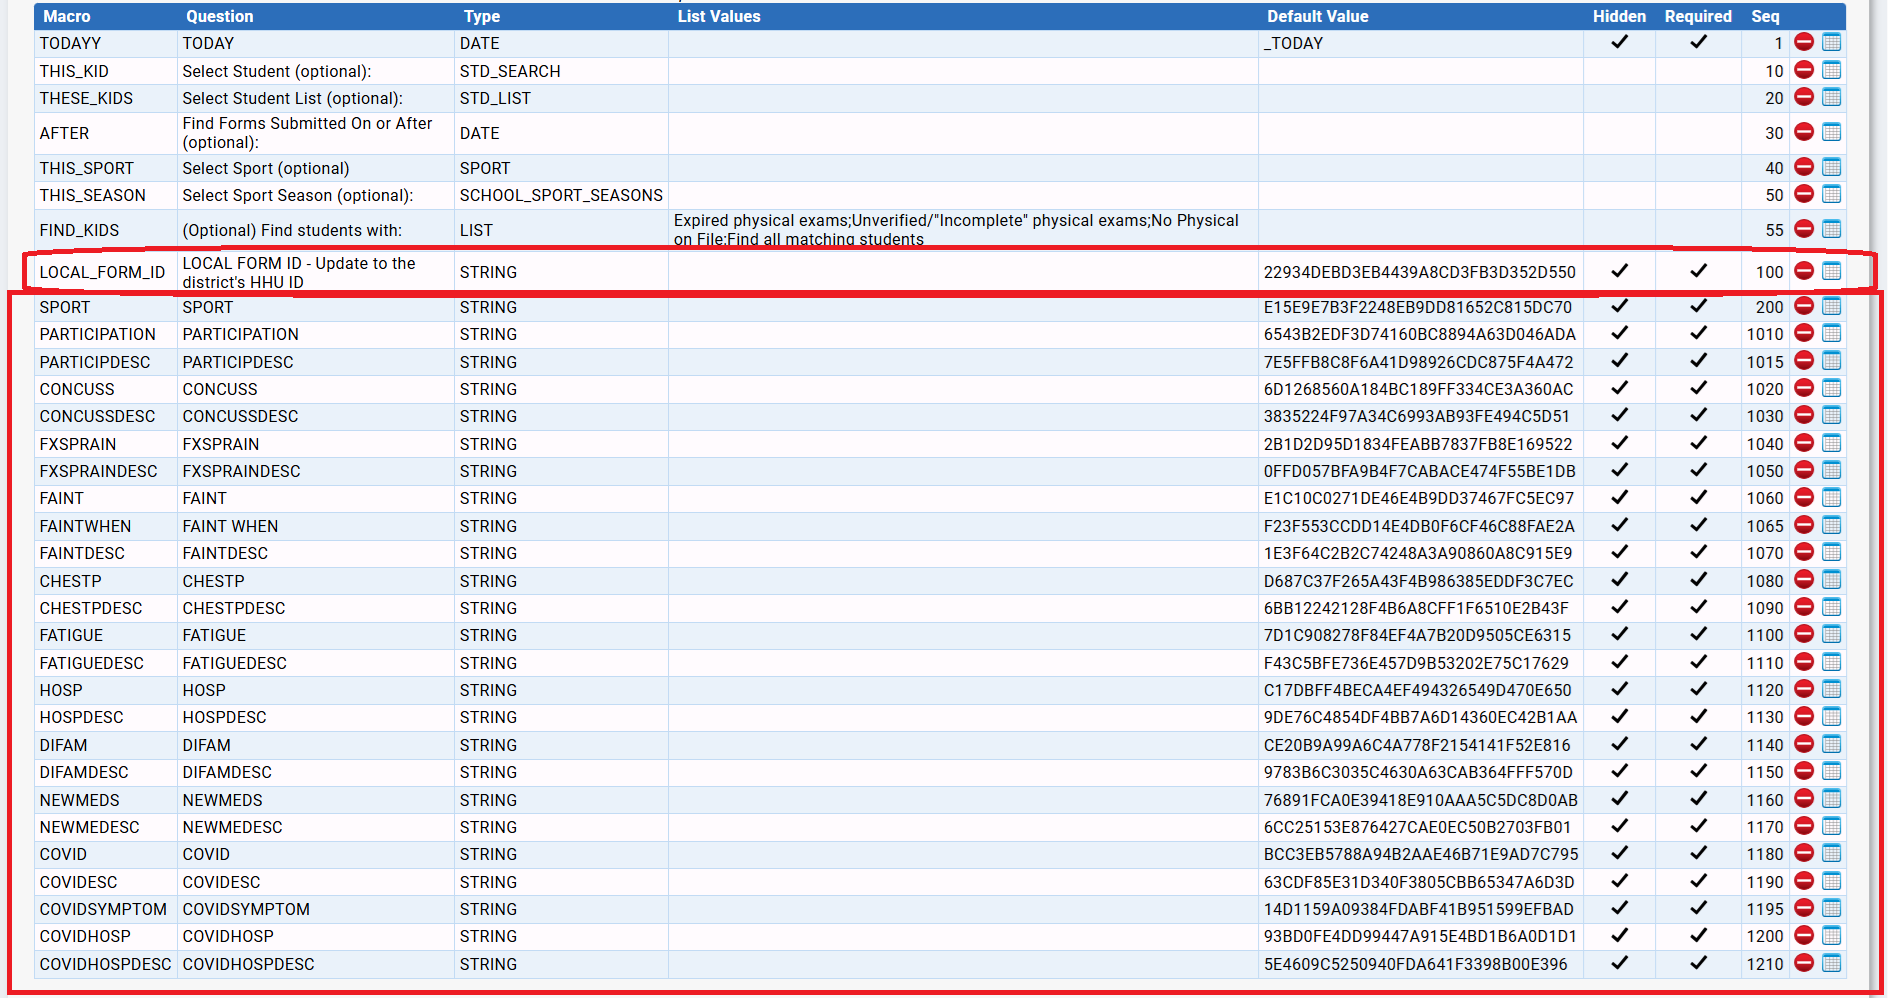
The Parent Form the report is connected to is identified by the LOCAL_FORM_ID parameter. Each question on the PDF form the ReportWriter report generates is itself attached to a "question" in the Parent Form - and each of those Parent Form questions is identified by a lengthy "Question ID". Each of the long list of hidden parameters here ties a question in the generated PDF form to a question asked in the Parent Form.
CAVEAT: All of these macros are specific to this one ReportWriter report. This is NOT a general facility. These are placed here strictly to try and ease the pain of having to update this one ReportWriter report.
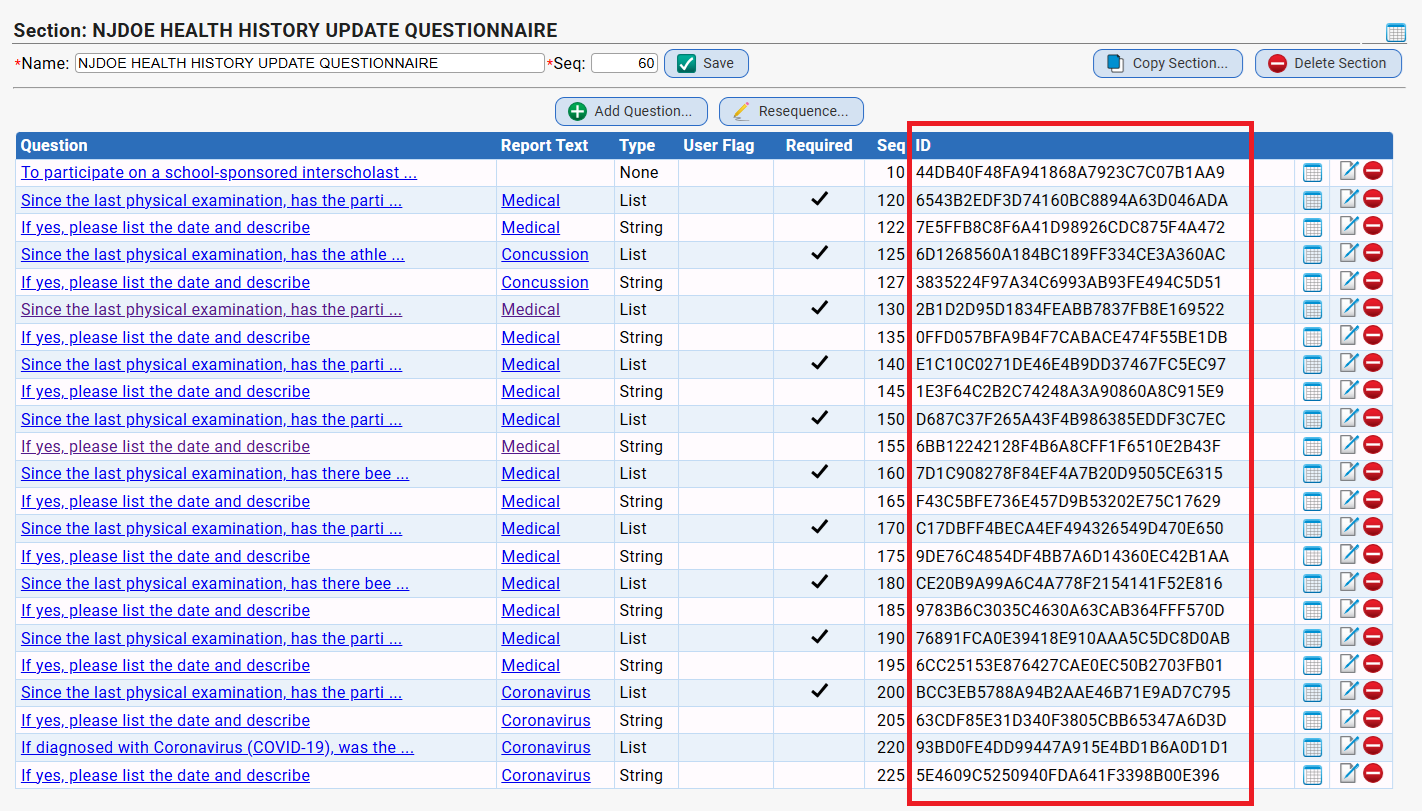
The following identifies which question each Macro is tied to:
The yellow text is the name of the macro that is tied to each question. For example, the FAINT macro (FAINT in the above image) populates question "4. Fainted of blacked out?".
Some of the macros (e.g. NEWMEDDESC) appear between lines. That is because the NJ Health History Update Form does not have an official field corresponding to that question in the Parent Form, so the answer is printed "between the lines". There are more questions on the Parent Form than individual fields on the printed form.
Those lengthy codes are the "QuestionID" for each question in the Parent Form. When you edit the Parent Form, the "Question IDs" are displayed on the right side of the "Question" screen:
The "Question ID" is how the ReportWriter can access the parent's answer for the question.
Copying and Updating the Health History Update Parent Form
WARNING: Whenever you alter the Parent Form you will likely need to also update the ReportWriter report. The ReportWriter will not automatically update when you alter the Parent Form. The system does not "know" they are connected.
Copying the Parent Form
When you copy the Parent Form - for example to create a new one for a new Sports season - the copy will have a new "Form ID". Whenever you copy the form, you will also need to copy the ReportWriter Report and "localize" it to the new form - install the new form's FORM ID in the new report.
When you copy a Parent Form the Question IDs in the copy are the SAME as the Question IDs in the original. You do NOT have to update the Question IDs when you copy the form.
Adding New Questions or Building a New Parent Form from Scratch
When you add a new question, the new question has a new "Question ID". Similarly if you build a new Parent Form scratch, with all new questions, each of the new questions will have its own new "Question ID". The ReportWriter report will need to be updated to extract answers from the new questions using the new questions' Question IDs.
Editing Existing Questions
Editing an existing question does NOT alter its Question ID. Simply editing a question does not require the ReportWriter report to be updated. However, if you delete it and re-add it, it is now a "new" question and the ReportWriter report will need to be updated.
Updating a Question ID in the ReportWriter Report
The reason the macros are listed on the 3. Parameters screen of the report is so replacing the corresponding Question ID will be easy (easy ish).
1. Identify which macro needs to be updated.
2. Go to the 3. Report Parameters screen of the Report.
3. DELETE the original macro.
4. Re-add it using the new question's Question ID:

Make sure you check both the "Required" and the "Hidden" checkboxes when adding the updated parameter.
Where are the Question Macros Used in the Report?
On the 2. Columns screen of the ReportWriter report, the columns that extract answers from the Parent Form use the macros to specify the "questionid" (Question ID) from which to get the 'parent's response to the question:
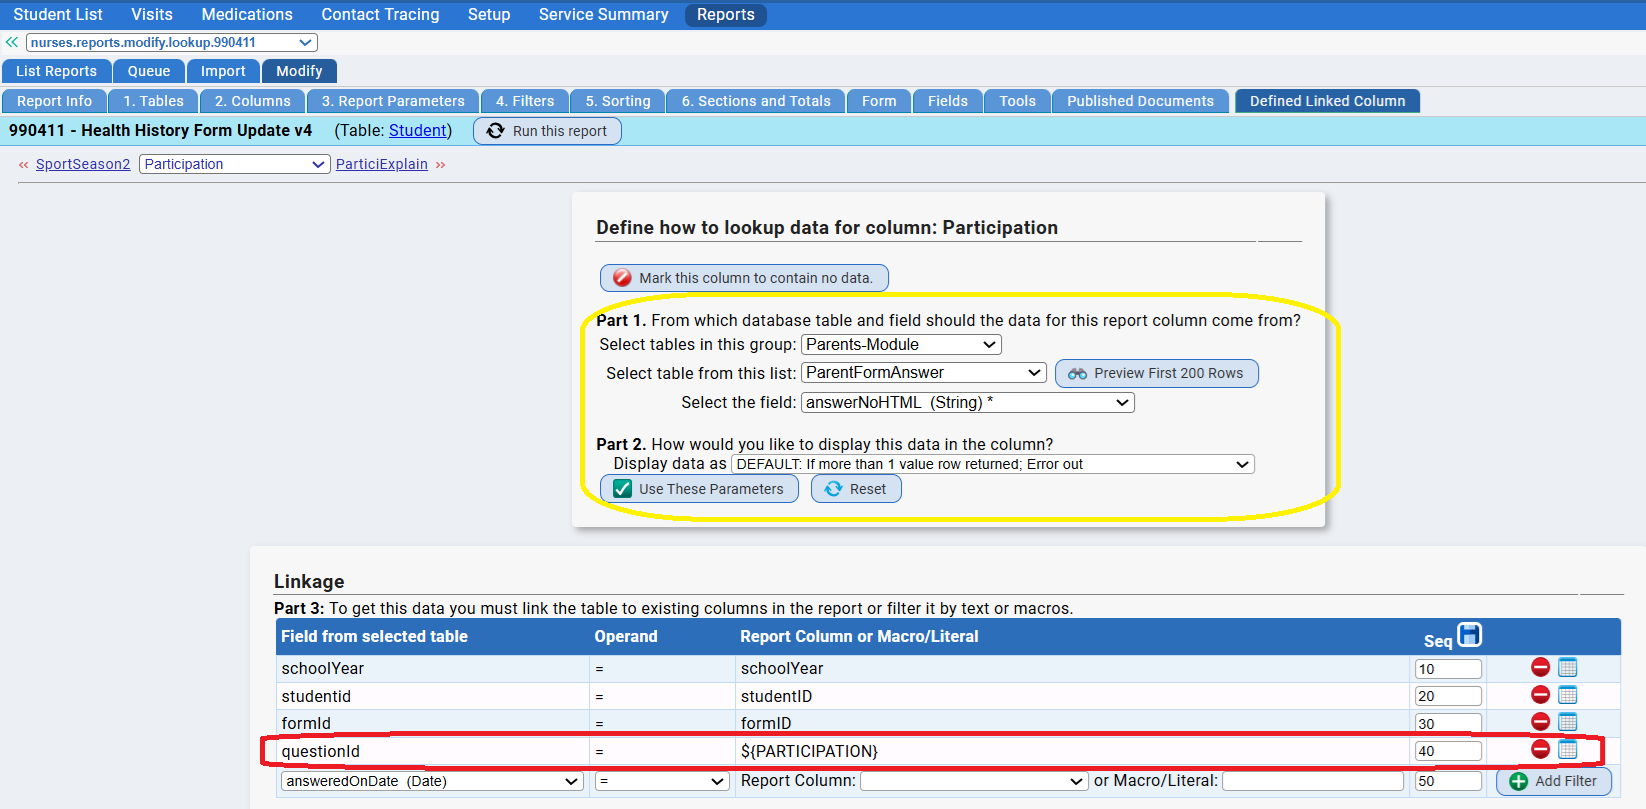
Macros are used, as noted above, to make the process of updating the Question IDs easier than it might have been if you had to update the "Defined Link Column" screen for each question itself.
Altering the PDF Health History Update Form Itself
If you want to alter the Health History Update PDF Form itself (that is, the form the report prints), you must:
- Download the MS Word document and alter the physical form. Download the Word document here.
- Save the altered Word document as a PDF.
- In the ReportWriter report, replace the existing "form", on the Form screen, with the updated PDF.
- Test run the revised report to make sure the fields still line up correctly on the revised form. If they do not, use the coordinates on the "Fields" screen to correct their alignment.
Note that fields will not automatically re-adjust to the changed form. You need to do this manually by adjusting each field's X and Y coordinates.
CAVEAT: PDF Forms in the ReportWriter cannot exceed 1 page. The ReportWriter is not capable of generating multipage forms.
Was this article helpful?
That’s Great!
Thank you for your feedback
Sorry! We couldn't be helpful
Thank you for your feedback
Feedback sent
We appreciate your effort and will try to fix the article